Wednesday, 12 December 2012

Mend: Toddler Long Johns


Inspiration:  Super Simple Leggings from Make It-Love It!

What I made:  Toddler Long John Bottoms

It's cold!!!  Time to dig out the thermals...but I needed to make some for the kiddies.  I began my search for a old pair of thermals or sweatpants that I could upcycle into toddler ones.  Luck!  I found this pair of long john bottoms that were my husbands.  They don't fit him anymore, and they don't fit me either...and they're not my style or colour.


I began to look for a template, and I knew that Make It & Love It has a great post about leggings for kids.  I used this as my template for the thermal underwear.  I won't leave a tutorial here, because I followed the post's instructions, with two exceptions:

  • I hand sewed the thermals; the kids were up and little C is severely afraid of loud noises.  Seriously...she gets physically ill every time I use the vacuum cleaner.
  • I also gave the thermals a wider leg, because I liked the look of them.  
You can get one set of thermal bottoms out of an adult pair.  Here is the finished product, modeled on my son:


Tuesday, 11 December 2012

Make: Penne Bolognese


This is a great go-to recipe, and is tasty, easy and cheap to make.

For Penne Bolognese:

Serves 4

2 Tbsp oil
350g penne, cooked and drained
375g ground/minced beef
400g can of plum tomatoes
1 onion, diced
2 cloves garlic, minced
Salt, to taste
Pepper, to taste
1 tsp basil
1 tsp oregano
1/4 tsp sage
1/4 tsp marjoram
1/4 tsp rosemary
Dash of nutmeg
Dash of paprika
3 large mushrooms, cut into slices (optional)
Parmesan/Pecarino Romano cheese (optional)

1.  Cook pasta until al dente; drain and set aside.
2.  Heat oil in a medium pan; add onion and garlic and cook until translucent.
3.  Add ground/minced beef.  Once it has started to brown, add your mushrooms--you can also use any other type of vegetable, like peas, carrots, zucchini, eggplant, etc.
4.  Once the beef has browned, and the mushrooms have began to soften, add your tomatoes.
5.  Crush the tomatoes, and add salt, pepper, basil, oregano, sage, marjoram, rosemary, nutmeg and paprika; stir until well combined.
6.  Cover and simmer on low heat for about 10 minutes.
7.  Serve sauce over pasta; top with Parmesan or Pecarino Romano cheese.


Monday, 10 December 2012

Do: Go paperless--Easy Baby Wipes Spray


I've been trying to go as paperless as I possibly can.  It's better for the environment, and better for your wallet, too.  I found myself using lots of baby wipes, and not just to wipe bottoms.  I started using them for anything...wiping countertops, quick dusting, and much more.  Not good, especially when we're trying to stick to a strict budget.  So, I've come up with an easy baby wipe spray to use for the little ones, and just use a good ol' cloth and cleaner for the rest!

To make the spray:

15 oz boiled water
1 Tbsp baby wash
1 Tbsp baby lotion
1 Tbsp oil--you can use baby oil, body oil, any type.  I used grapeseed oil, from the health market.  It was relatively inexpensive, and better than petroleum based baby oils.

1.  Put the boiled water in a large container.
2.  Add the baby wash, baby lotion and baby oil
3.  Mix thoroughly, and wait for it to cool.
4.  Once it has cooled, add to a spray bottle, and keep the rest in a closeable container.

And that's it!  

Definitely wait for the mixture to cool before transfering it to a spray bottle.  Unlike me...who got this in return...


I cut up a few flannel blankets to use for the wipes, in 5" by 3" rectangles.  Just give the bottle a shake, spray onto baby's bottom, and wipe!  Dispose of the waste in the toilet, and let the wipes soak in a bucket of laundry detergent, and perhaps a bit of bleach.  Wash as normal.

It's a fast, easy, and cheap alternative to store bought baby wipes.


Wednesday, 5 December 2012

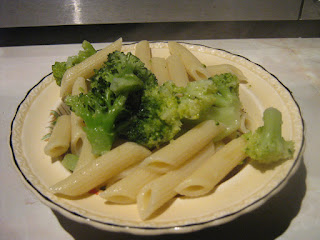
Make: Broccoli and Penne

When I was living in NJ, I would go out and order Cavatelli and Broccoli often.  Such a wonderful pasta dish.  I have been feeling a bit homesick, so for tonight's dinner, I'm making my own version--Penne and Broccoli.


Oil for sauteing 
2 cloves garlic
Salt, to taste
400 ml chicken stock
170 ml white wine
1-2 pats butter
Juice of 1 lemon, or a few dashes of bottled lemon juice
1 head cooked broccoli, or the equivalent in frozen broccoli
Pasta--enough to feed 4

Cook your pasta until done.
Steam/cook broccoli until done.
Heat oil in large pan.
Add the garlic; cook until starting to brown.
Add the chicken stock--100 ml at a time, stirring throughout.
Simmer for 2 minutes.
Add the white wine, stirring throughout.  
Add the butter, stirring until melted.
Add the lemon juice, stir.
Simmer for 2 minutes.
Add the broccoli, stirring until broccoli is coated.
Cover and simmer for 5-7 minutes; place pasta in a large bowl while waiting for broccoli to finish cooking.
Once finished, pour the broccoli and sauce over the pasta, stir unitl pasta is coated.
Garnish with Parmesan or Pecarino Romano cheese.  

You can omit the white wine and lemon juice if you wish; this dish is just as tasty without them.


Make: Lentil and Chickpea Curry

In the spirit of "make do", I searched my cabinets for something to make for tonight's dinner.  I found red lentils ( a LOT of them, to be honest), just sitting there waiting to be used.  I bought them ages ago, in a fit of vegetarianism, and had since forgotten about them.  I'm actually glad I found them, because my son has recently become a vegetarian, of his own making.  I have tried to get him to eat meaty things.  I have even tried to hide bits of chicken, sausages, turkey, ham, etc, etc, in meals, just like mums all over have tried with veggies.  But, no luck.  He finds them, puts the pieces to one side, and eats the rest.

So, a vegetarian meal is on the menu tonight.  Red lentils.  I bought a bag of dried chickpeas during last weeks shop, so I decided to make a  Lentil and Chickpea Curry.

*The measurements of spices are for reference only. You can add more or less, depending on your own preference.*
1 onion, diced
2 cloves garlic
Oil (to use for frying--use your own preferred variety)
1 tsp chili powder
1 tsp salt
1/2 tsp black pepper--crushed pepper is better, but regular pepper is good :)
1 tsp turmeric
1 tsp paprika
1 Tbsp cumin
1 Tbsp ground cilantro/coriander
2 tsp garam masala, plus extra to taste
2 cans chickpeas or 3 cups cooked chickpeas
2 cans whole tomatoes
1 c cooked lentils
4 Tbsp heavy cream

If you don't have some of the above spices, such as turmeric or ground cilantro, you can get already made curry powder in most supermarkets.  I find when making this dish, I use the spices, and then add a bit of curry powder just to add some more flavour.

You can also add more veggies and beans to this dish--mushrooms, broad beans, or spinach make nice additions.

Heat your oil in a medium pan.
Add the onion and garlic; cook until brown.
Add your spices and cook for about 2 minutes, stirring frequently so the spices won't stick to the bottom.
Add chickpeas, tomatoes and lentils, stir until combined.
Simmer for 10-15 minutes.
Add the heavy cream; taste to see if more spices are needed.  This is when to add more garam masala or curry powder, if you wish.
Simmer for about 5 minutes.
Serve over rice--I prefer basmati rice, because it has such a great flavour, but you can use brown or long grain if you have that on hand.


I think I made too many lentils....


A tasty and healthy that even my kids like it.  Definitely a plus.

Monday, 3 December 2012

Mend: Christmas Stockings

Three weeks until Christmas!  I can't believe how fast time flies!

This year, it's going to be a tight Christmas, so I've decided to hand make as many gifts as I can.  Starting with the little ones' stockings!  I've been seeing several pins each day, on Pinterest about making your own stocking.  Instead of using a tutorial, I thought that I would free-hand it and sew it by hand.

This past summer, while visiting my husband's Aunt, she had cleaned out her closet and was ready to give five or so bags of clothing to charity.  I took almost everything!  I figured I could either wear some things, or use it all for sewing projects.  Two lovely, but too big, sweaters have now been used to create stockings.

I don't have any photos of the original sweaters, as I have had them cut up for months.  They just needed sewing.

To make a stocking, take a sweater and turn it inside out.  You can use a stocking you already have to use as a stencil, download a template (Martha Stewart has a good template), or you can draw it freehand.  I chose freehand, which is why mine look a bit skinny.  I think I'll try a template the next time I try this.

Trace around your stocking/template, or draw a a general stocking shape onto your sweater with tailor's chalk.  If you don't have chalk, you can use pencil, pen, marker or drawing chalk.  Use whatever you have on hand.

Once you have two pieces, pin them together, making sure the edges are as close as possible, all the way around.


Once you have pinned the edges together, you can start sewing.  You can do this with a sewing machine, but as I am fairly new to using the machine, I thought I'd hand sew this.  I used a backstitch all the way around, to make it as secure as possible.  


You can turn down the top of the stocking and add embellishments, or you can sew a cuff onto it. I took two spare bits of fabric and measured them to the width of the stocking.  I sewed the fabric together to make a cuff and pinned the cuff to the stocking, right side out.  I sewed all the way around, as close to the top of the stocking as possible, with matching thread.  

Here are the final products--sorry for the wrinkles!


Big C's stocking


Little C's stocking.  I added a bit of lace to the edge for a bit of girly-ness.

All in all, a success.  Two small stockings for two small kiddies.  I don't think they'll really care as to what they are; they'll be more interested in what's inside!

Friday, 30 November 2012

Friday Night = Pizza Night!


In this house, Friday night is pizza night!  It is a tradition that began with my parents, and I hope that my children will continue with when they have families of their own.  I love pizza...I could eat pizza everyday from now until the end.  I could eat a whole pie...and have done so, several times, though I am embarrassed to admit it.  I take that back, no, no I'm not embarrassed, not one bit!

So, pizza night!  I'm making two pizzas, as usual, for my family, but for my own dinner, I get to have someone else make my pizza tonight.  It is a one time thing, as we can't afford to send me out every week; it's to make up for the Vintage Fashion Show that was cancelled (very disappointed in that--they cancelled it due to a "lack of interest".  No wonder, the only place I saw it advertised was in a local deli.  It wasn't even advertised in the place that was sponsoring it!)

As I'll be at dinner with my dear friend K, my flock will be chowing down on their own pizza.  This recipe will make two pizzas.

For the base, I use:

4 c flour--this can be bread flour, plain flour or a mix of the two.  I found that plain flour works best for me.
1 sachet yeast (approximately 2.25-2.50 tsp)
1 tsp sugar
1 tsp salt
A couple of drizzles of olive oil
12-14 oz hot water

Mix the dry ingredients together well; add the olive oil and water.  Mix all together until you get a nice, firm ball.  You may have to add more flour to get the right consistency.  Turn out into a greased bowl; cover with cling film and set aside in a warmer part of your kitchen (or any room, really) for 1 hour.  

Pre-heat your oven to 180 C/360 F.  Turn out the dough ball onto a lightly floured surface, and divide into two balls.  Cover them with the clingfilm  and let rest for 10 minutes.  You can make the sauce while you wait.

For the sauce, I use:

1 tin whole plum tomatoes--I tend to use these instead of pre-crushed tomatoes, as I like the sauce to still be a bit chunky.
...and the rest of the ingredients are not measured.  I purposely do not measure them, as I like to add and subtract the amount of spices I use.  Sometimes, I just don't have a particularly ingredient, so I omit it from the recipe.

Olive oil
Garlic--1 or 2 cloves
Salt (to taste)
Pepper (to taste)
Basil
Oregano
Sage
Thyme
Marjoram
Rosemary

This my own personal "Italian Blend" of spices.  I find it works well for me, but you can add or omit any other ingredients you find tasty.  Place the tin of tomatoes in a sauce pot, and cut them up with either a spoon or potato masher.  I use a potato masher as it still leaves the tomatoes a bit chunky.  Add as much olive oil and cloves of garlic as you like.  I tend to use 1-2 drizzles of olive oil and 1-2 cloves of garlic.  Add the remaining ingredients, and heat through.

After the dough has rested, place one ball on a lined or greased baking sheet.  I have used parchment paper, as the baking sheet I have is old and peeling.  Spread the dough out onto the baking sheet, and add as much sauce as you like.  Put the sauce covered dough into the oven, and bake until the crust of your pizza is slightly cooked.  I find this is good way to ensure the finished pizza is cooked thoroughly.


Add any toppings you like!  Tonight, I used green and black olives, ham and mushrooms. After adding your toppings, cook your pizza until the crust edges are a bit brown.


Then add your cheese.  Again, use any cheese you prefer; I have used mild cheddar and fresh mozzarella.  I line the pizza with the cheddar first, then the mozzarella.


Put back into the oven until the cheese has melted.  I leave mine in until the cheese is a bit brown on top.  Tasty!


Repeat for your second pizza, or if you want, you can freeze the second dough ball until you want to use it.  Just defrost in the refrigerator for at least 1 day prior to needing it.

And there you have it...two pizzas that can easily feed a family of four!

***Forgive the quality of the photos.  I had to use my camera phone, because I can not find the cable for my camera :(  ***


RIP, my dear friend, my IPhone


My Iphone....has passed away.

I must have left it too close to the radiator overnight....it is now a bulging mass of machinery.  It, surprisingly, still works...a little.  I was able to hurry and get all of my photos off of it.  That would have been a real tragedy--photos of my wee ones when there were very wee.  Newborn photos; photos of special times.  Photos that I thought, "eh, I'll put them on the computer someday soon."  Almost gone.  I'm just very glad that the Iphone can take a beating and snline ASAP, just in case my 3 year old laptop decides to kick the bucket.


You can see the bulging at the back


My phone in bits :(


Internal detail of the bulging


Another view


Goodbye, dear Iphone...you will be missed.

Thursday, 29 November 2012

Chickkis Pie


Woke up to a very frosty morning today.  So, definitely not taking the wee ones out in that.  That meant, however, I was extremely limited on food stuffs for dinner.  I was going to make chicken chili; I can make one piece of chicken breast stretch far turning it into chili.  But...didn't have the stuff.  So...what to make, what to make?   I found some potatoes in the storage bin, and found a large turnip, and I knew I had some carrots in the crisper.  I went online to find out what spices are used in haggis...wonder if I could make chicken "haggis" pie,  from now on to be called chickkis pie :)  According to one site, dried coriander, cinnamon and nutmeg are used occasionally to flavor haggis.

So, I boiled the potatoes, mashed them, added some double cream and whipped them.  I then boiled the turnip and carrots together until they were very soft, and mashed them.  I baked the chicken until done, chopped it up into small bits, and layered salt, fresh black pepper, dried coriander, cinnamon and nutmeg over the chicken.  I then layered the turnip and carrot mix over top of the chicken.  The potatoes were layered on top of the turnip and carrots; I then added a fine layer of shredded mild cheddar cheese.   I baked this at 180 C until the cheddar was a bit crisp on top.  I served it with brussel sprouts and steamed sweet potatoes.  Very nice dinner, for very little money.  Me likes this lots.